How To Make A Homemade Water Filter
Welcome to our comprehensive guide on how to make a homemade water filter. Clean drinking water is something many of us take for granted. Yet, around the world, millions struggle to access this basic necessity.
With rising concerns about contamination and pollutants in our water supply, the importance of having a reliable source of clean water has never been clearer. You might think that creating your own water filter sounds complicated or daunting.
However, making a homemade water filter can be simple and rewarding. Not only does it ensure that you have safe drinking water at hand, but it also empowers you to take charge of your health and well-being. Ready to dive into an easy DIY project? Let’s explore how to make a homemade water filter!
The Importance of Clean Drinking Water
Access to clean drinking water is vital for health and survival. Contaminated water can lead to various illnesses, including gastrointestinal infections, cholera, and even long-term diseases such as kidney damage.
Safe drinking water not only supports our physical well-being but also affects mental clarity and energy levels. When hydration is compromised, our bodies cannot function optimally. In addition to personal health, the availability of clean water has broader implications for communities.
It plays a crucial role in sanitation practices and helps prevent the spread of disease. Furthermore, having access to pure water encourages healthier lifestyles. People are more likely to choose hydration over sugary beverages when they know they have safe options readily available.
With growing pollution concerns globally, relying on questionable sources only increases risks. Understanding how essential clean drinking water is can motivate us all to seek effective solutions for purifying it at home.
Types of Water Filters
Water filters come in various types, each designed to tackle specific contaminants. Activated carbon filters are popular for removing chlorine, sediment, and volatile organic compounds. They improve taste and odor significantly.
Reverse osmosis systems take it a step further, using a semi-permeable membrane to eliminate dissolved solids and bacteria from water sources. Ceramic filters utilize tiny pores to trap impurities while allowing clean water to pass through. They’re great for filtering out larger particles like dirt or rust.
Ultraviolet (UV) purifiers use light to kill bacteria and viruses effectively. This method is chemical-free and safe for household use. Gravity-fed filters are simple yet effective solutions that don’t require electricity. These systems rely on gravity to pull water through the filter medium, making them ideal for emergency situations or outdoor activities.
Materials Needed for a Homemade Water Filter
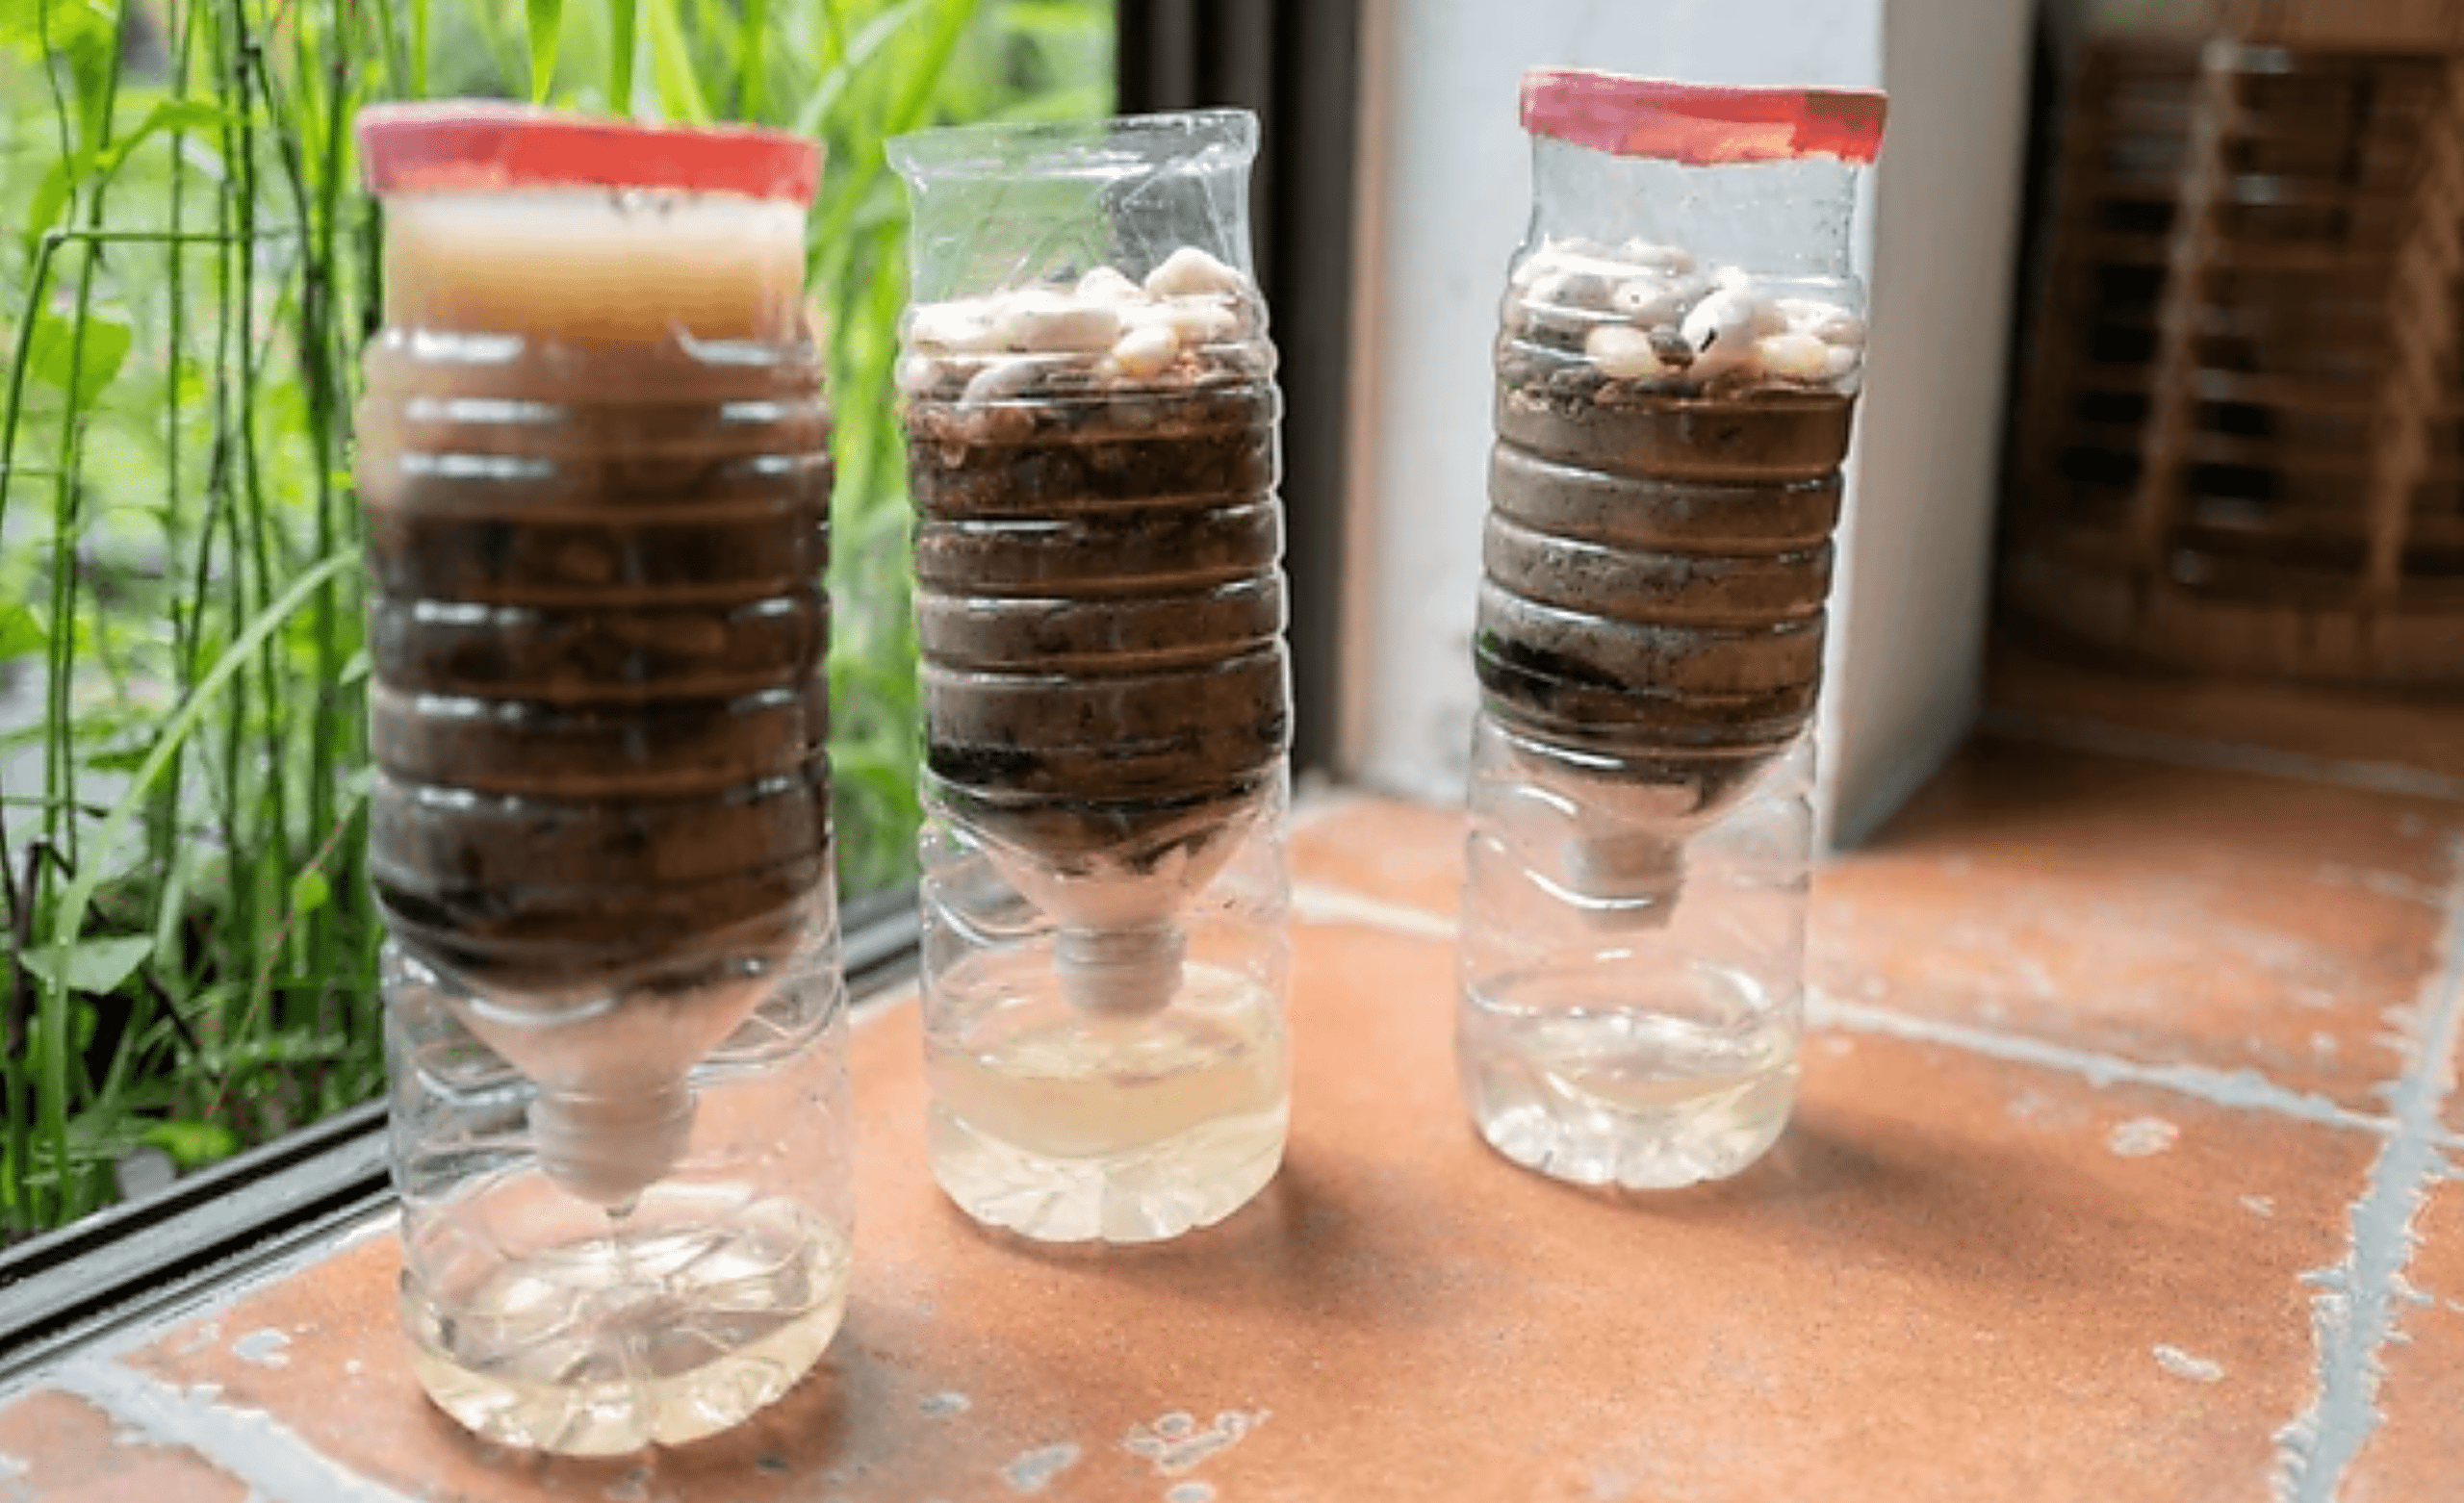
Creating a homemade water filter requires just a few common materials. Start with an empty plastic bottle or a container that is easy to work with. You’ll want to cut it in half for effective layering. Next, gather some clean sand and gravel. These will act as the primary filtration components, trapping larger particles and debris.
Charcoal is another crucial ingredient. Activated charcoal works best, as it removes impurities and improves taste. You’ll also need coffee filters or cheesecloth to keep the smaller particles from slipping through into your filtered water.
Have some untreated water ready for filtering; this can be sourced from lakes, rivers, or even tap water if you’re looking to improve its quality. Each material plays a vital role in creating an efficient filter system that you can easily assemble at home.
Step-by-Step Guide on Making a Homemade Water Filter
Step 1: Preparing the Container
The first step in crafting your homemade water filter is preparing the container. This vessel will hold all the filtering materials, so choosing wisely is key.
A plastic bottle or a glass jar works well. If using a bottle, cut it in half horizontally. Keep the top portion; this will serve as your filter’s funnel. The bottom half can catch the filtered water.
Make sure to clean your chosen container thoroughly before use. Any residue can contaminate your water and defeat the purpose of filtration.
If you’re using a plastic bottle, remove any labels to avoid chemical leaching into your drinking water. A simple rinse with warm soap and water should suffice for most containers.
Once cleaned and ready, place it in a stable position where you’ll assemble the layers of filtration material next. With that done, you’re one step closer to having clear, purified water!
Step 2: Creating a Layer of Gravel and Sand
Now that your container is ready, it’s time to create the filtering layers. Start with gravel. This coarse material acts as a primary barrier, catching larger particles and debris in water.
Spread an even layer of gravel at the bottom of your container. Aim for about two inches in depth. This layer helps prevent clogs further up in your filter.
Next comes sand, which fills the gaps left by the gravel. The fine texture of sand allows it to trap smaller particles as water flows through. Pour a layer on top of the gravel that’s also around two inches deep.
Ensure both materials are clean before using them in your filter to avoid introducing unwanted contaminants. Carefully compact each layer while maintaining separation between them for optimal filtration efficiency.
Step 3: Adding Activated Charcoal and Cotton Balls
Now it’s time to enhance your filter with activated charcoal and cotton balls. Activated charcoal is a powerhouse when it comes to purification. It absorbs impurities, odors, and harmful chemicals lurking in water.
Start by adding a layer of activated charcoal on top of the sand and gravel mixture you created earlier. A thickness of about two inches should do the trick. This will dramatically improve the quality of your filtered water.
Next, take some cotton balls or pieces of clean cloth and place them above the activated charcoal layer. They act as an additional barrier that traps smaller particles before they pass through.
This combination works wonders in ensuring cleaner water flows down into your container below. It’s simple yet effective—a perfect addition to your homemade filter system!
Step 4: Finishing Touches and Testing the Filter’s Effectiveness
Once your filter is assembled, it’s time for the finishing touches. Give it a final inspection to ensure all layers are properly placed and secure. Check that there are no gaps where unfiltered water could escape.
Next, prepare to test its effectiveness. Take some dirty or questionable water and pour it slowly through the filter. Observe how well the water flows through each layer, noting any sediment caught along the way.
After collecting filtered water in a clean container, examine its clarity and smell. For an added measure of safety, consider using a simple home testing kit to check for contaminants like bacteria or heavy metals.
This step not only showcases your handiwork but also reassures you that your homemade filter is working efficiently. Making adjustments may be necessary based on your findings—remember that perfection takes practice!
Testing and Maintenance
Testing your homemade water filter is crucial to ensure it’s doing its job effectively. Start by collecting a sample of filtered water and running it through basic tests. You can use test strips available online or at local stores to check for contaminants like chlorine, lead, and bacteria.
Regular maintenance keeps your filter working efficiently. Replace the filtering materials as needed—usually every few weeks. If you notice a change in flow rate or an unusual taste, it’s time for a thorough check.
Don’t forget to clean the container used for filtration regularly to prevent any buildup of bacteria. Proper care extends the lifespan of your DIY filter and ensures that you always have access to safe drinking water without worry.
Benefits of Using a Homemade Water Filter
Creating a homemade water filter offers significant advantages. First, it allows you to customize the filtration process based on your specific needs. You can choose materials that target particular contaminants present in your water source.
Cost-effectiveness is another appealing aspect. Store-bought filters can be pricey, while making one at home often requires just simple and accessible items.
Using a homemade filter also promotes sustainability. By repurposing household materials, you reduce waste and lessen your environmental footprint.
Additionally, this hands-on project enhances your understanding of water quality and safety. It fosters awareness about what goes into our drinking supply.
There’s an undeniable sense of accomplishment that comes with crafting something useful from scratch. This DIY approach not only provides clean water but also connects you more deeply with the resources around you.
Conclusion
Clean drinking water is essential for good health. With the right knowledge and materials, anyone can create a homemade water filter that effectively removes impurities. By understanding different types of filters and their functions, you can choose the best method for your needs.
Making a homemade water filter is a straightforward process if you gather the necessary materials and follow the steps carefully. Regular testing ensures that your filter remains effective over time, while routine maintenance helps to prolong its lifespan.
The benefits of using a homemade water filter extend beyond just cleanliness; they also include cost savings and environmental sustainability. Whether you’re preparing for emergencies or simply looking to improve your household’s access to clean water, this DIY project empowers you with control over what you consume.
Crafting your own water filter not only enhances awareness about safe drinking practices but also encourages self-sufficiency in an increasingly complex world. Embracing such skills can lead to healthier living and greater peace of mind regarding one of life’s most basic necessities—water.
2 thoughts on “How To Make A Homemade Water Filter”
Leave a Reply
Related Posts
How To Purify Drinking Water
How To Build An Air Fountain System
Thanks for this wonderful reminder. I remember making one of these as a school project years ago and it worked pretty well. It is very useful to know how to do these things, as you never know where and when you will need to produce your own fresh drinking water.
It may be a good idea to write the date that the filter ingredients were last changed on the bottle so you can keep track of when to freshen it up.
Hello Michel,
You’re very welcome and thank you for stopping by and sharing your thoughts about making a homemade water filter. As you can see in the post, making your very own homemade water filter is easy to do and life saving knowledge should you ever need it. You never know when you might need to use a homemade water filter if ever but you now know how to make it should you find yourself in need of fresh clean drinking water.
Best wishes Michel,